
Ten Practice Discs
In most tournament play, before each of the first two games of best-of-three matches each player gets to shoot a total of ten discs to learn the court. Here is the method and sequence that I recommend to maximize what you learn about the court and color you will play from the practice shots.
CourtShuffleboard.com scope note: Practice-shot procedures and the number of practice discs vary by tournament, organization, and local rules. The sequences in this article assume a format that permits the described practice opportunities; confirm the applicable rules before using them in competition.
TWO FOR SPEED
First Head-Yellow shoots two discs, then Head-Black shoots two, then Foot-Yellow shoots two, then Foot-Black shoots two. After each two discs are shot, they are removed from the board before the next two as the players are not supposed to use any discs on the board as targets or guards during the two-for-speed shots.
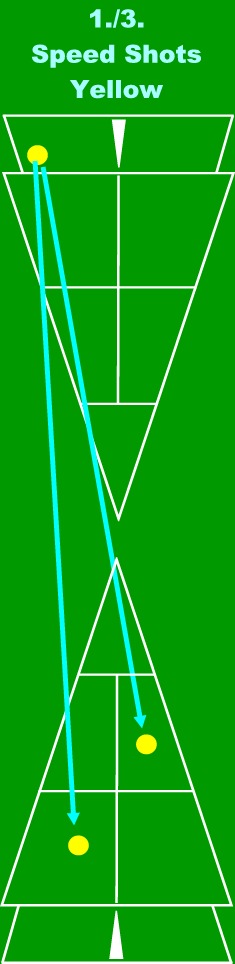
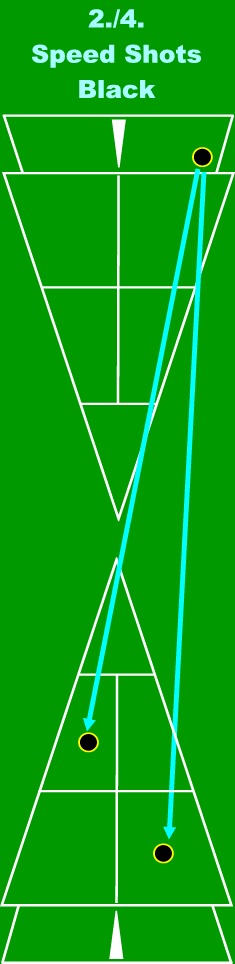
I recommend shooting your Two-For-Speed discs to learn both about the speed of the court and of the discs, as well as to learn the drift of the court when shooting to hide behind your St Pete and Tampa guards, as follows:
Disc 1: Shoot your #4 disc from the Four Position directly at the center of the eight on the opposite color of the court, to make a scoring eight. You are imagining that you have a St Pete guard that you are shooting behind. Note how far left or right your disc lands to the center of the eight. This tells you how much drift there is to adjust for. Also watch the whole path that the disc follows to learn about the drifts along its journey.
Disc 2: Shoot your #3 disc from the Four Position directly at the center of the seven on the same color of the court, to make a scoring deep seven. You are imagining that you have a Tampa guard that you are shooting behind. Again, note how far left or right your disc passes to the center of the eight, and how it drifts after to land in the seven. This tells you how much drift there is to adjust for. Also watch the whole path that the disc follows to learn about the drifts along its journey.
EIGHT PRACTICE DISCS
The next eight discs are considered practice discs. You are allowed to utilize your own discs or your opponent’s discs (if they are already at the other end) as targets or guards to practice various shots. Your partner can also position the end of their cue stick anywhere on the board to simulate a disc in that position. The first half of the sequence of shooting is: Head-Yellow shoots four discs, then Head-Black shoots four, then Foot-Yellow shoots four, then Foot-Black shoots four. The second half of the sequence is: Head-Black shoots four, then Head-Yellow shoots four, then Foot-Black shoots four, then Foot-Yellow shoots four.
Most players that are playing Yellow use their first two of the four practice discs to practice shooting behind a St Pete and a Tampa. For the first disc, their partner places the shooting end of their cue stick on the board in the spot where a St Pete would be, for Yellow to shoot behind. Then the partner will put the first disc shot into the Tampa position for Yellow to shoot the second disc behind. The same is done by the Black player when starting the second half of the eight-practice-discs sequence. However, if you followed the Two-For-Speed shots I recommended above, you have already practiced your St Pete and Tampa hides, so why do it again? You should have already learned what you need to know about speed and drift for those two shots. Here is what I recommend for the best use of your eight practice shots:
PLAYING HEAD-YELLOW: FIRST FOUR PRACTICE
Disc 1: Shoot #1 disc from the One Position directly at the center of the eight on the opposite color, to make a scoring eight. Learn about the speed and drift to make an eight on that side – a shot that you will likely often use for your hammer shot.
Disc 2: Have your partner place that first disc you shot as a doubling disc centered on the 7/8 line on your color side, about 8” from the left edge of the disc to the centerline. Shoot #2 disc from the One Position directly at it, trying to tap the doubling disc gently to double. Observing the path your cue disc follows, learn about the speed and drift to score an eight and to double a disc on the 7/8 line on your yellow side of the court.
Disc 3: Have your partner place a disc as a deep centered ten, removing all other discs from the court. Shoot #3 disc from the One Position directly at it, trying to kitchen it as well as score your ten. Learn about kitchen speed and the drift when shooting for a ten.
Disc 4: Have your partner place a disc centered on the centerline in the middle of the eights, removing all other discs from the court. Shoot #4 disc from the One Position straight down the court, following along your color side of the centerline. Learn about the drift when putting up a Tampa, the drift along the centerline, and the speed for splitting a doubling disc that sits on the centerline. If there is any drift to the court, it is unlikely that you will successfully make the split, scoring both discs, but you will learn how to adjust for that drift for later use during the game.
PLAYING HEAD-BLACK: FIRST FOUR PRACTICE
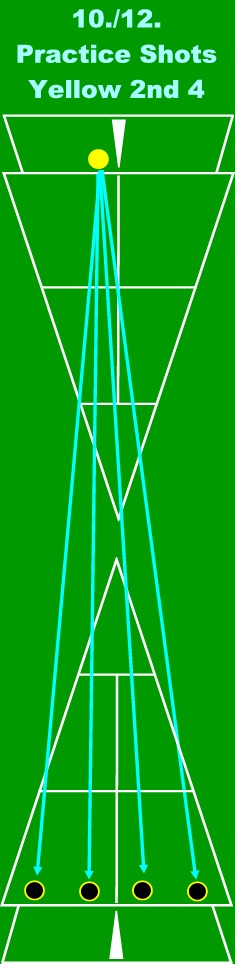
Have your partner set up the four yellow discs across the deep seven, one near each corner (outside edge of the disc about even with the outside edge of the intersection of the kitchen sideline and the 7/10 line) and the other two yellow discs about three inches from either side of the centerline. This is commonly referred to as “four across” and can also be signaled as your setup request by holding up four fingers to your partner or whoever is at the other end. You will shoot your four practice discs, one each directly at these four-across discs, trying to tap them into the kitchen, starting with the disc on an outside corner of the court and progressing across the court to the other outside corner. Shoot all four of these practice shots from the One Position. After each shot, once you have made all your observations and are ready to take your next practice shot, have your partner take away any discs that are in the way of your next shots (including any that are sitting in the kitchen that might interfere with the next one you send into the kitchen) and replace any disc you have yet to target if it got moved. Learn about kitchen speed for each shot and the drift in each area of the court. Remember, shoot directly at the target discs without compensating for court drift even if you already know something about the drift. It doesn’t matter if you miss the disc as you are just trying to learn more about court speed and drift.
Many players set the four-across discs at equal distances across the seven line, rather than the more extreme positions I have recommended. I have found that the positions I use are more critical for accuracy during the game. Since they are closer to the outside lines and the centerline, they are less forgiving for leaving your disc scoring when you are shooting to clear a deep seven and stick in scoring. For the deep seven positions between those positions, you can extrapolate the necessary adjustments for drift from what you learn about the four more extreme positions.
FOOT-YELLOW: FIRST FOUR PRACTICE
Follow the same sequence as the first four for Head-Yellow.
FOOT-BLACK: FIRST FOUR PRACTICE
Follow the same sequence as the first four for Head-Black.
HEAD-BLACK: SECOND FOUR PRACTICE
Follow the same sequence as the first four for Head-Yellow.
HEAD-YELLOW: SECOND FOUR PRACTICE
Follow the same sequence as the first four for Head-Black.
FOOT-BLACK: SECOND FOUR PRACTICE
Follow the same sequence as the first four for Head-Yellow.
FOOT-YELLOW: SECOND FOUR PRACTICE
Follow the same sequence as the first four for Head-Black.
OVERVIEW OF ALL TEN PRACTICE DISCS
- Head-Yellow shoots “Two for Speed” from the Four Position: first at eight on black side; second at seven on yellow side.
- Head-Black shoots “Two for Speed” from the Four Position: first at eight on yellow side; second at seven on black side.
- Foot-Yellow shoots “Two for Speed” from the Four Position: first at eight on black side; second at seven on yellow side.
- Foot-Black shoots “Two for Speed” from the Four Position: first at eight on yellow side; second at seven on black side.
- Head-Yellow shoots four practice from the One Position: first at eight on black side; second to double a 7/8 liner near the center of the yellow side; third to kitchen a centered deep ten; fourth down the line through the Tampa position and beyond to split a centered liner.
- Head-Black shoots four practice from the One Position: shoot to kitchen each of four across the deep seven, starting with the outside and going across in order.
- Foot-Yellow shoots four practice from the One Position: first at eight on black side; second to double a 7/8 liner near the center of the yellow side; third to kitchen a centered deep ten; fourth down the line through the Tampa position and beyond to split a centered liner.
- Foot-Black shoots four practice from the One Position: shoot to kitchen each of four across the deep seven, starting with the outside and going across in order.
- Head-Black shoots four practice from the One Position: first at eight on yellow side; second to double a 7/8 liner near the center of the black side; third to kitchen a centered deep ten; fourth down the line through the Tampa position and beyond to split a centered liner.
- Head-Yellow shoots four practice from the One Position: shoot to kitchen each of four across the deep seven, starting with the outside and going across in order.
- Foot-Black shoots four practice from the One Position: first at eight on yellow side; second to double a 7/8 liner near the center of the black side; third to kitchen a centered deep ten; fourth down the line through the Tampa position and beyond to split a centered liner.
- Foot-Yellow shoots four practice from the One Position: shoot to kitchen each of four across the deep seven, starting with the outside and going across in order.


ADDITIONAL TIPS
When shooting your speed and practice shots, shoot directly at the target. Don’t try to compensate for drift. That way you will learn the direction and amount of drift for shooting from your starting position to that target spot on the court and can adjust your shots during the game accordingly. Most players don’t shoot directly at the target for their practice shots. Instead, they shoot their practice shots imagining the likely effect of the drift on their shot and shoot to land in the target spot to score. Don’t do this! This is just practicing making scores. That is NOT what I recommend for the practice discs. Use your practice discs only to learn the speed and the drifts of the court by shooting directly at the target, even if the drift takes it out of scoring. During the game play, you will use this information to accurately place discs and make scores. For other starting positions or other target spots on the court than those you shot at for your practice, you can extrapolate from what you learned from the practice shots. But be watchful for variations as courts can have unusual peaks and dips that affect the drift.
Make sure that your partner knows that this is the method you use for the practice shots so they don’t lose confidence in your shooting abilities when they see you missing your practice targets due to drift. Using this method also could mislead your opponent into thinking you are a poor shot. They may decide that you’ll probably miss if they place their disc at a location that you missed. Won’t they be surprised when you land it spot on during play! Also inform your partner to let all the moving discs come to a full stop when you take your practice shot before they move any, so you can observe the full movement. Your partner should also prevent their opponent from moving any of the discs when you are taking your practice shots.
Never use a second practice disc to shoot at the same target a second time. You may have mis-shot by mistake in the angle or speed the first time, but you will have still gained some information. Go on to the next target to learn about all your other target spots rather than expend a second shot on the same target.
Watch the full path of your practice shots carefully, noting any unusual shifts in the drift. You will often notice that there is suddenly more drift or a shift in the path of the disc, particularly in the deep seven area. Take note of these to avoid making errors in your shots during the game.
Kitchen speed is the speed at which you shoot the cue disc to land it in the kitchen. You use kitchen speed by hitting at a target disc that is between your cue disc and the kitchen, thus transferring the movement from your cue disc to the target disc. Kitchen speed will generally be the same whether shooting at a near disc or a far disc, with just a slight increase in speed when you shoot cross court at a target disc due to the slightly longer path to get to the disc, or with a necessary small increase in speed if you are sending the target disc to the kitchen at an angle due to the longer path to the kitchen. It doesn’t matter how far the target disc is in front of the kitchen. For instance, use the same speed to kitchen a high eight or a deep seven (assuming both are in the center of the same side). When shooting your practice discs, if you miss your target and put yourself in the kitchen, give yourself a congratulation – you shot your disc at the correct kitchen speed.
Watch carefully the practice discs that your partner and your opponents shoot. You can learn a lot about the court drifts from watching.
Keep an eye out for areas of the court that have little or no beads, making the practice discs slow or stick. You can take a careful look over the court before starting practice to see if parts of the court look light on beads. You can ask for re-beading after the speed shots of the first game of a match, before or after the speed shots of the second game of a match, or before the start of the third game of the match. If all players agree to re-beading, call the tournament director and tell him all players agree to re-beading. If your opponents don’t agree, you can still ask the tournament director to come check the court to see if he judges the court to need more beads.
Watch and listen for slow discs when shooting your practice discs. A disc that makes more noise as it travels over the beads is usually a slower disc due to bumps or valleys in the bottom surface of the disc. If you detect a slower disc, you may want to shoot it earlier in your frames so you have a normal speed disc for your last shots, i.e. hammers or hide opportunities. (Note: The black discs in a set usually travel a little bit slower than the yellow discs, due to the slight composition difference in ratio of color dye to plastic.)
You can examine the bottoms of the discs (both colors) before or during your practice shots and anytime it is your turn to shoot during a game. You may notice some anomalies in the surface of the bottom of a disc. Before the start of practice, you can request a different set of discs or re-waxing of your color if they don’t look satisfactory. Turn any bottom edge nicks or chips to the edge closest to you to prevent them from slowing down your shots. You are allowed to use a grease pencil or chalk to mark on top of a disc to know which edge to turn towards you. But you best not be straightforward about it as this may help your opponent too when you switch colors, such as mark the #2 disc for the bad spot on the #1 disc, the #3 disc for the #2, etc.
You can wipe off the bottom of any of your color discs at the start of a frame if you see some beads, dust or something else sticking to it. But don’t wipe them off if there is moisture on the courts (rain, mist, humidity) – you would just be making a disc that plows the moist beads on the court rather than gliding over them.
Courts with embedded beads that are not regularly resurfaced often have sticky kitchens – discs tend to slow down and stick when they get to the kitchen area. Ofttimes the home-court players on such courts will be kitchen players, and they think they are very good at playing such strategy. But when they play at other clubs that don’t have embedded beads or are better maintained, they won’t fare so well. It’s often not their skill that makes them a “great” kitchen player but rather the characteristics of their home courts. You may need to adjust your strategy to avoid getting kitchened when playing those courts. For instance, use St Pete guards instead of Tampa guards if your opponent successfully goes for kitchening your Tampas.
The painted lines on a court also can be sticky, as the slightly raised surface may cause a disc to slow, especially when the paint line becomes mottled from long use. If your shots meant to ease over a line tend to stop on the line, it might not be an error in the speed of your shot but rather a sticky line. Be careful about adjusting to a faster shot as once the disc gets past the line it can pick up speed again, sending the disc faster than you really wanted, possibly into the kitchen.
Sometimes, you only get six discs before a game rather than ten – two for speed and four for practice. Use the two for speed the same way as always, and the four for practice to do four-across. If you are shooting yellow, your partner can use the prong-end of their cue to simulate the first target disc at one outside corner of the deep seven, raising the cue out of the path of your cue disc as it arrives so you can see how far your disc travels. Then your partner can move your shot disc to the second four-across position for you to shoot at, and so forth for each additional practice shot. This six-disc sequence will give you the best read of the court speed and drifts with the more limited quantity of shots. Once in a while you may only get two shots for speed before a game, no additional practice shots. Do the usual two-for-speed shots; the rest you will have to learn during play (and by watching the other players do their two-for-speed shots).
I highly recommend the use of drift cards, to chart the drifts of the court and make notes about the speed of the court and discs.
Related Learning Lab Articles
This article is also part of Coach Martin’s Learning Lab.