START HERE
New to Shuffleboard
Welcome to court shuffleboard! This beginner guide will help you understand the court, equipment, scoring, shooting motion, basic game flow, and an introduction to the shuffleboard strategy you need to start playing with confidence.
You do not have to learn everything before you play
Court shuffleboard is easy to begin and takes years to master. Learn the basic flow of the game, build a sound shooting technique, and then let experience add the finer points of strategy and shot-making. Most importantly, have fun and keep learning.
Court Shuffleboard in a Minute
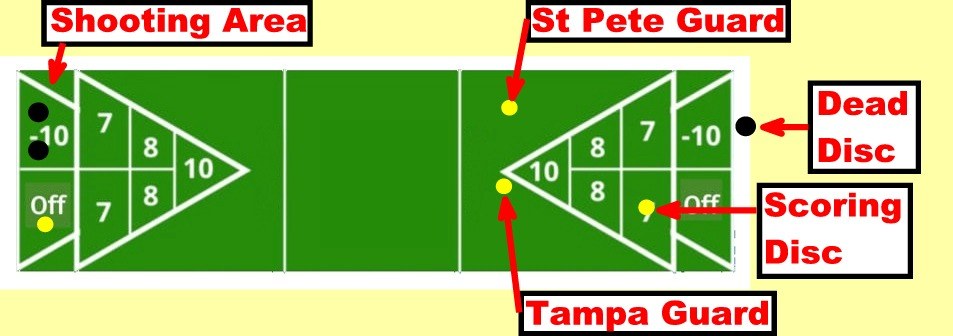
Players use long cues to slide colored discs down a court toward the scoring triangle at the opposite end. The scoring areas are worth 10, 8, or 7 points. A disc that finishes in the bottom 10-Off area — commonly called the kitchen — counts minus 10 points.
The object is to finish the game with a higher score than your opponent. But shuffleboard is much more than simply trying to land discs in scoring. You will also clear opposing discs, protect your own, use guards, hide scores, block shooting lanes, and decide when it is better to stay off the board. That mix of touch, accuracy, and strategy is what keeps the game interesting as your skills grow.
Meet the Court and Equipment
Cue and Discs
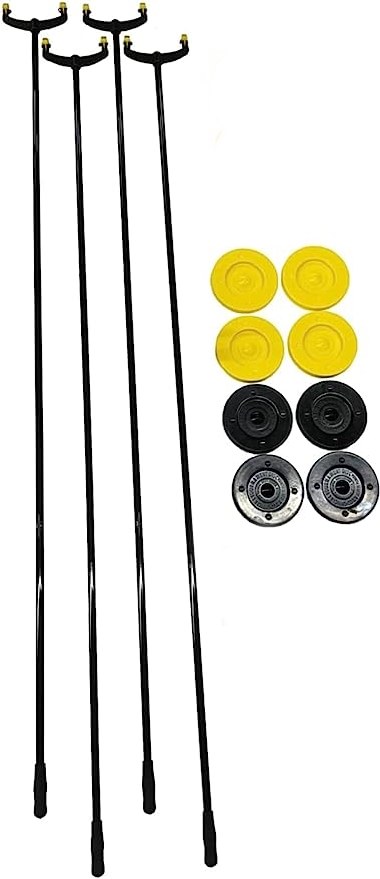
The long shooting stick is usually called a cue or cue stick; you may also hear tang or simply stick. The round pucks are called discs, or sometimes biscuits. Each player shoots four discs of one color, from their side of the starting area to anywhere on the board.
Head and Foot
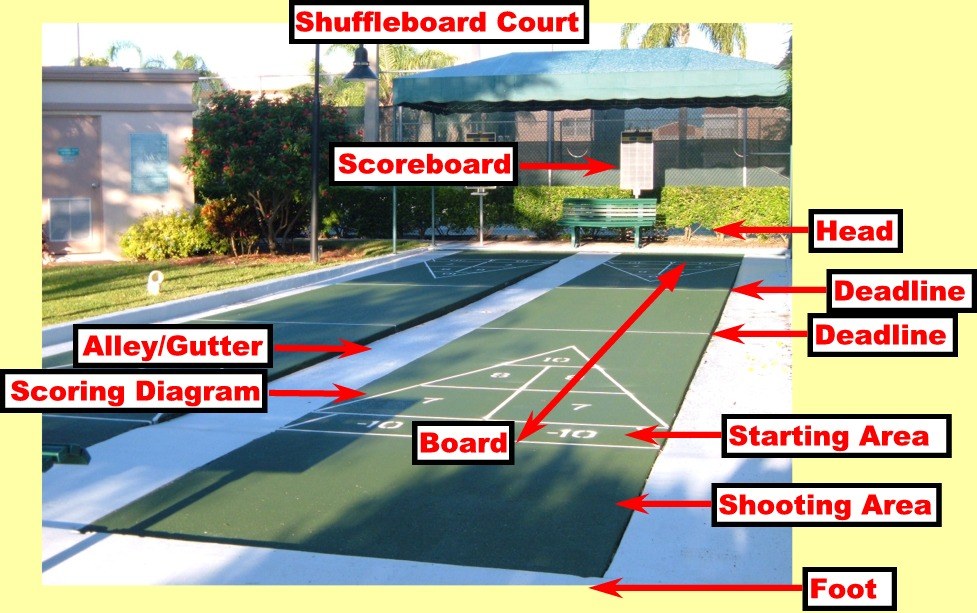
The end of the court with the scoreboard is called the head; the other end is called the foot. After all eight discs are shot from the head (called a frame), the next frame is shot from the foot. Play continues rotating back and forth between the head and the foot until the game is complete. Your opponent is the player standing beside you playing the other color. In doubles, your partner stands across from you at the other end and plays the same color as you, the opponent partner at that end playing the other color.
Scoring Triangle
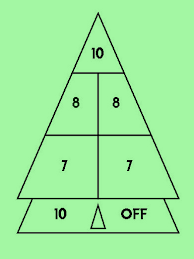
The scoring triangles at each end contain the 10, 8, and 7 scoring areas and the 10-Off kitchen. The baseline forms the bottom of the triangle. The horizontal lines in the field of the court between the triangles are the deadlines.
The Playing Surface
Many courts are dressed with tiny glass beads that reduce friction and let the discs travel easily. The beaded playing surface can be very slippery. Walk in the alleys beside the court rather than down the playing surface, and wear closed-toe shoes when you play to protect your feet from fast-moving discs.
How a Frame Works
- Start with four discs each. The opposing colors are lined up in the starting area at the head of the court, each color taking one side, yellow on the right at the head and on the left when play is at the foot.
- Players alternate shots. Yellow shoots first in the opening frame of any game (shooting first is called “out“). Once the yellow disc stops, black shoots a disc, play continuing back and forth until all eight discs have been played from that end, completing the frame.
- Each shot has a purpose. You might try to score, place a guard, hide behind a guard, clear an opponent’s disc, or block an important lane.
- The eighth disc is the hammer. The hammer is especially valuable because the opponent has no shot remaining to remove it after it is played.
- Score the frame after all eight discs have been shot. Total the scoring discs for the frame for each color, then add the scores from that frame to the running totals on the scoreboard. A score for the frame can be negative if any discs are in the kitchen.
- Continue from the other end. In doubles, the partners at the opposite end play the next frame. In singles, the players walk to the other end to play the next frame. Or there can be two other players playing their own singles game from the other end so that no one has to walk back and forth between the ends.
- The color that shoots first changes with the frame. The color shooting first each frame depends on whether it is singles or doubles play, and according to the game format. Usually in singles, yellow is always out at the head every frame, and black is always out at the foot. In doubles, the most common format is yellow out twice, once at each end, then black out twice, once at each end.
A disc that does not reach the far deadline, goes completely beyond the far baseline, or leaves the playing surface is a dead disc and is removed from play. Rules and procedures can vary with the organization and event, so use the rules in effect where you are playing.
How Scoring Works
A disc scores only when it is completely inside a scoring area and is not touching a boundary line. The values are:
- 10 — ten points
- 8 — eight points
- 7 — seven points
- 10-Off / Kitchen — minus ten points
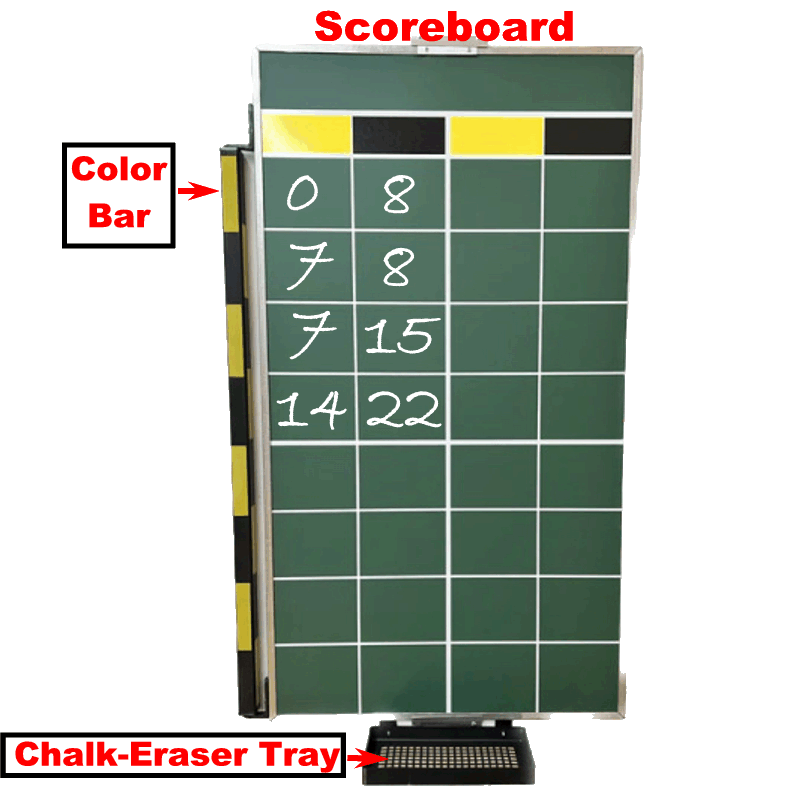
When a disc is very close to a line, look at it carefully from directly behind the disc in relation to the line being checked. If you need to go down the court to inspect a disc, walk down the alley — not down the beaded court.
The most important beginner foundation: learn a repeatable shooting motion
Good shooting starts before the disc ever moves. A relaxed setup, a clear aim, a smooth weight transfer with steps forward, and a straight pendulum swing give you a motion you can repeat and refine for years. Accuracy and speed control become much easier when the basic delivery stays well-formed and consistent.
How to Shoot
The two-step delivery below is a strong starting method for a new player. It is written for a right-handed player; a left-handed player reverses the feet. Individual players may adapt the motion for comfort or physical needs, but the basic goals remain the same: stay relaxed, aim before moving, swing straight, and finish the motion.

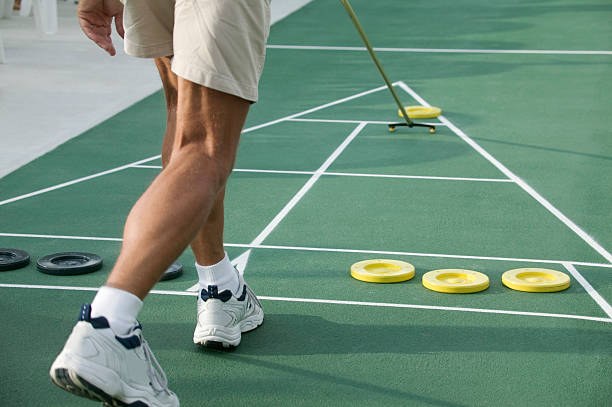
1. Set the disc and cue
Set your disc somewhere on your side of the starting area for the shot you want to make. Bring both runners of the shooting end of the cue gently against the disc. Keep them against the disc; do not pull the cue back before or during the shot.
2. Hold the cue lightly
Let the handle end of the cue rest lightly on two, three, or four fingers and steady it with your thumb. Keep the hand and wrist relaxed by your side, elbow relaxed and unbent. A tight grip adds tension and makes a smooth, consistent delivery more difficult.
3. Get relaxed and aim before you move
Stand comfortably balanced with your weight distributed evenly and your feet and shoulders square to the direction you want to shoot. Let your shooting arm and hand hang loosely beside your hip with the elbow unbent and relaxed. Turn and adjust your whole body until you are aimed along the path you have chosen, keeping your feet even and aligned with your shoulders.
Do all of your aiming before the shot begins. Once you start moving forward, the goal is to send the cue straight along the path you already selected rather than steering it during the swing. Straight doesn’t mean straight down the court; it means straight along the path that you are aimed, with your whole body, shoulders, feet and cue aligning in the same direction.
4. Take the small first step
Take a small step forward with your right foot and shift your full weight onto it. During this first step, do not move your hand, cue, or disc forward. Your body moves ahead of the hand, leaving the hand naturally behind your hip and ready for the forward swing.
5. Take the larger step and make the pendulum swing
Take a larger step forward with your left foot and shift your full weight onto it. During or at the end of that step, swing your arm, hand, cue, and disc straight forward down the chosen path in one smooth pendulum motion, elbow unbent. Don’t run or rush through the steps, it is just a natural walking pace.
6. Follow straight through
Continue the pendulum swing from behind your hip all the way to comfortable full extension of your arm. Keep the cue runners on the court. Do not bend the elbow to steer, twist the wrist, or push the cue to one side or the other. Your grip is loose so your wrist can naturally pivot as you extend your arm over the court. The cue should finish on the same shooting path you chose before the shot.
7. Control distance with swing speed
The speed of the disc comes primarily from the speed of your pendulum swing — not from muscular force. Use a slower swing for a slower, shorter shot and a faster swing for a faster, longer shot. Keep the same smooth delivery. Do not punch or jab the disc for more speed, and do not stop the swing short to make the disc travel less distance.
Aim first. Then shoot straight.
Once the shot begins, your job is not to steer the disc. Your job is to reproduce a relaxed, smooth, straight delivery along the path you chose before you started moving. Build that habit early and you will have a much stronger foundation for accuracy, speed control, and advanced shot-making later.
Your First Strategy
You do not need advanced strategy to begin making good choices. Start with a few principles that will remain useful as your game develops:
- If you have the hammer, protect your chance to score it. Keeping the board clear of other discs leaves you an easier open scoring shot with your last disc.
- If your opponent has the hammer, make the board harder for them. Guards, blocks, and hidden scores can take away their easy shooting lanes.
- Deal with exposed scoring discs. Protect one of your own when it is in the open, and clear your opponent’s right away.
- Watch the scoreboard. The best shot choice can change depending on who is ahead, by how much, and who has the hammer.
- Choose the percentage play. A comfortable 7 or 8 that you can make reliably is often better than forcing a difficult 10 or an ambitious kitchen attempt. Fancy shots are fun, but choosing the best strategy, even if it is boring, is the winning play.
Kitchen play becomes important as you advance. Concentrate on building dependable aim and speed control, but don’t shy away from more aggressive shots just because you have not yet developed them. There is usually a shot that is the best strategy choice. Take it even if you think you will have trouble making it. Your shooting skills will eventually catch up as you get more practiced and experienced.
A Few Words You’ll Hear Right Away
- Frame — one sequence in which all eight discs are shot from one end of the court.
- Hammer — the last disc shot in a frame.
- Guard — a disc placed to cover a disc from a direct shot or to block access to an area of the board.
- Hide — place a scoring disc where a guard helps protect it.
- Clear — shoot to knock a disc off the board, and often to get your shot disc off as well.
- Kitchen / 10-Off — the minus-10 area at the bottom of the scoring triangle.
- Deadline — one of the horizontal lines between the two scoring diagrams; a shot must reach the further deadline to remain live.
- Live disc / Dead disc — a disc that remains in play, or one that must be removed after the shot.
You will hear many more terms as you play. The online Dictionary will be the place to look them up without trying to memorize everything at once.
Where to Go Next
Coach Martin’s Learning Lab
Continue with practical coaching, shooting technique, strategy, practice ideas, and lessons designed to help your game develop step by step.
Rules & Reference
Look up rules, terminology, equipment information, and sourced reference material when you need more detail.
Articles
Explore discussions of shooting, strategy, decision-making, practice, and other parts of the game.
Welcome to Shuffleboard! — The Complete Beginner Guide
Welcome to Shuffleboard! — A Guide to Court Shuffleboard for the Novice Player goes beyond this web introduction with more detail on how the game is played, scorekeeping, shooting, strategy, terminology, tournaments, rules, organizations, and further reading.
If you are ready to keep learning, the full booklet is a good next step. You can read it below, download the PDF for later, or find it with the other beginner resources in Library & Downloads.
Read the booklet here
The embedded reader is provided by EmbedPress. If the reader does not load on a particular device, use the PDF download button above.
Source & Scope
This beginner page is adapted primarily from Martin Shapiro’s Welcome to Shuffleboard!, his current Newbie Orientation to Shuffleboard coaching outline, and his beginner-coaching materials. It is an introduction, not a complete play book. Rules, terminology, court conditions, customs, and tournament procedures can vary by country, organization, club, event, and court. When a particular rule or procedure matters, use the rules in effect where you are playing.